Table of contents :
Adding a signature in Outlook 2016-2019 Desktop version
- Formatting the signature in Outlook 2016-2019 desktop version
- Adding an Image to Outlook signature
- Setting Auto Outlook signatures
- How to manage the signatures
- How are HTML email signatures different?
Adding signature in Outlook 365 Web App
- Formatting the signature in Outlook 365 web app
- Adding image to Outlook 365 signature
- Setting Automatic Outlook 365 email signature
Adding Email Signature in Outlook 2010 Version
Setting the Email Signature in Outlook Mobile App
Adding multiple signatures in Outlook
How to make the same signatures for Outlook mobile and desktop versions?
Limitations of email signatures
Email Signature Generator Tools to Create Impeccable Outlook Signatures
Your email signature works like a digital visiting card you share with the client once they have read till the end. It offers a scaffold to connect with the customers and leave a memorable last impression. Many people overlook the importance of a business email signature and don’t pay enough attention to it. That’s a huge opportunity lost. Therefore, you must pay enough attention to what you include in the email signature and how the reader perceives it.
Through this article, we shall discuss how to create Outlook signatures correctly in the different versions. We shall also dive deeper into how to add links, images, social media icons, and format the signature for best visual appeal. It will help you go beyond the traditional sign off statements “Best regards”, “Kind regards”, or “Thanks and regards”. These signatures render the perfect closure to your personal as well as professional emails.
Adding a signature in Outlook 2016-2019 Desktop version
To add a Outlook email signature in 2016-2019 Desktop versions, follow the steps mentioned below:
1. Go to Outlook’s in-app editor.

2. Click on the search box at the left side of the screen at the top.
3. Type in “signature”.
4. “Signature” result will appear on the screen. Click on that.
5. Select the “Signature” option from the dropdown menu. Subsequently, you will be able to create Outlook email signature template using the in-app editor.
6. Click on the “New” button to prepare a new signature for your email.
7. Assign a name to the signature. This is especially important if you plan to create multiple signatures.
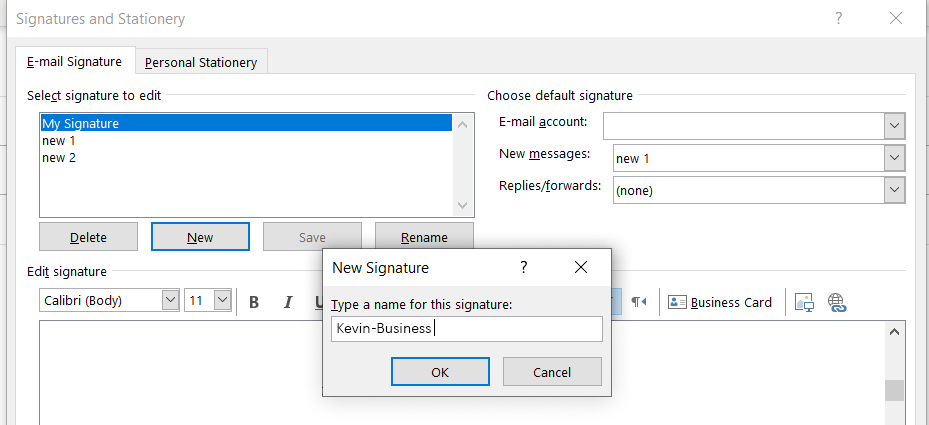
8. Add the specifications for the signature.
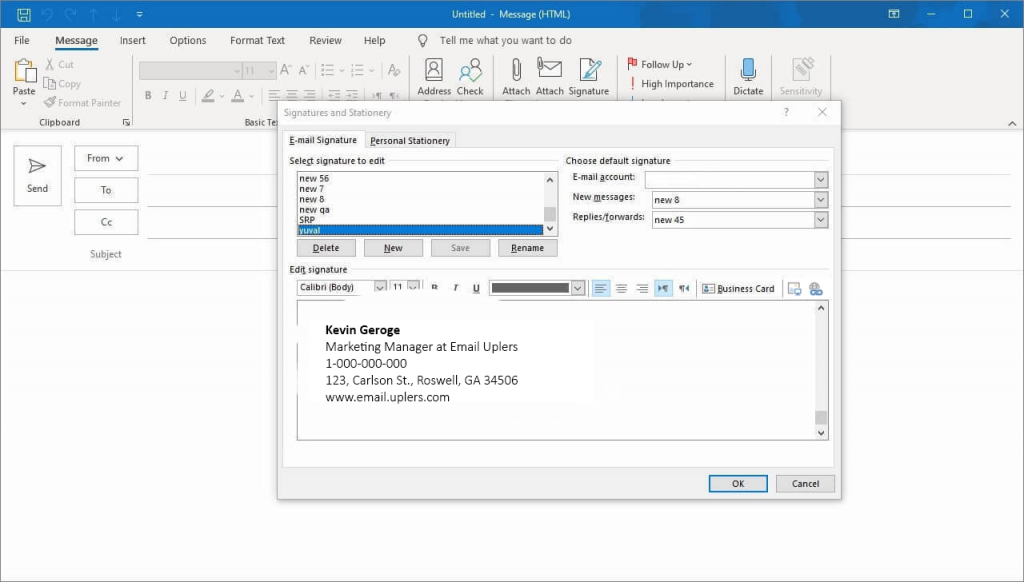
To create a simple text signature, go to the text field in the signature editor.
1. Type your name, designation, and contact details.
2. Click “OK” and that’s all.
Text-based professional signature for Outlook will look like:
Kevin Geroge
Marketing Manager at Email Uplers
1-000-000-000
123, Carlson St., Roswell, GA 34506
www.email.uplers.com
Formatting the Outlook Email Signature
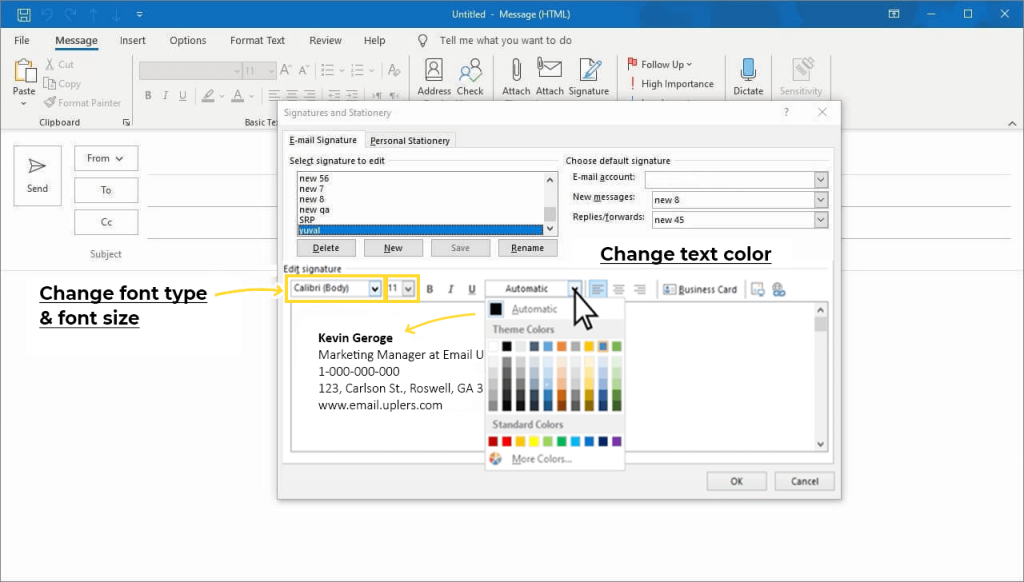
Just like your email designs should follow a visual hierarchy, so should your email signature. You can choose suitable font colors and font sizes based on the importance of that information.
How to change the text color:
Select the default text color and click the dropdown menu. Choose the color of your choice or pick the “More colors” option if you want to set a custom color.
How to change the text size:
Go to the Font Size dropdown menu after selecting the text. Pick the right size based on the hierarchy.
How to change the font type:
Select the text and go to the Font type dropdown. Choose the right option according to your brand personality and industry.
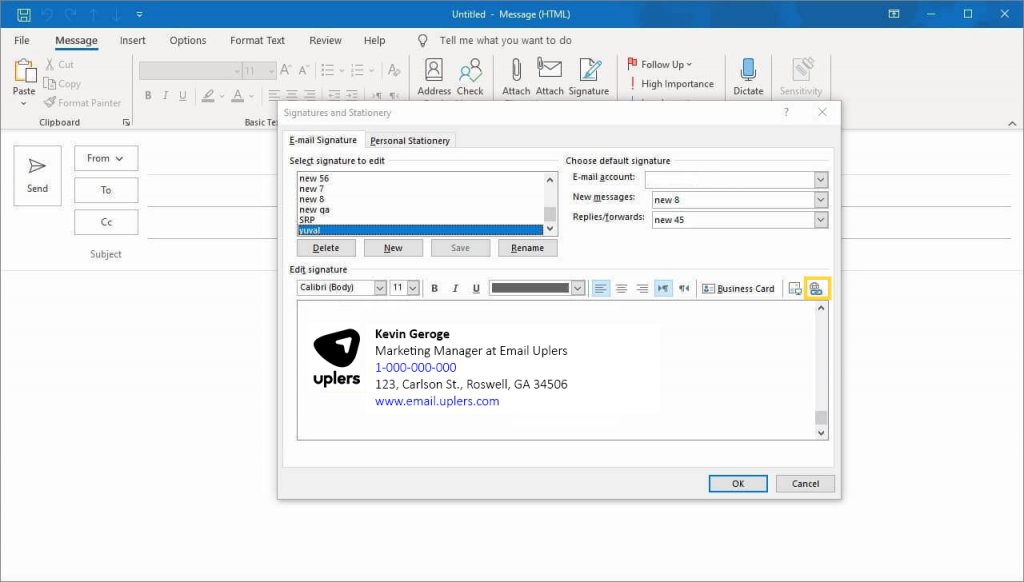
You can go still further and add a hyperlink to the Outlook signature.
Here’s how:
Select the text to which you wish to add the hyperlink. The text should be in a gray background when selected. Next, click on the link icon at the right side of the toolbar.
Enter the URL and click on OK.
Easy, right?
Now, what if you want to make your telephone number clickable?
Just add the prefix “tel:” to the phone number like “tel:1-000-000-000”.
Brick and mortar business owners can make their local address clickable and redirect the users to Google maps navigation.
Look for your business on Google Maps and click on the “Directions” button.
Subsequently, copy the URL from the address box.
Select the address from the Outlook signature and add the link from Google Maps like you did for the website URL.
Click OK and you are done.
Adding an Image to Outlook Signature
Click the cursor where you want to add the image in the signature.
Go to the image icon at the right hand side of the toolbar.
Upload the image from the computer.
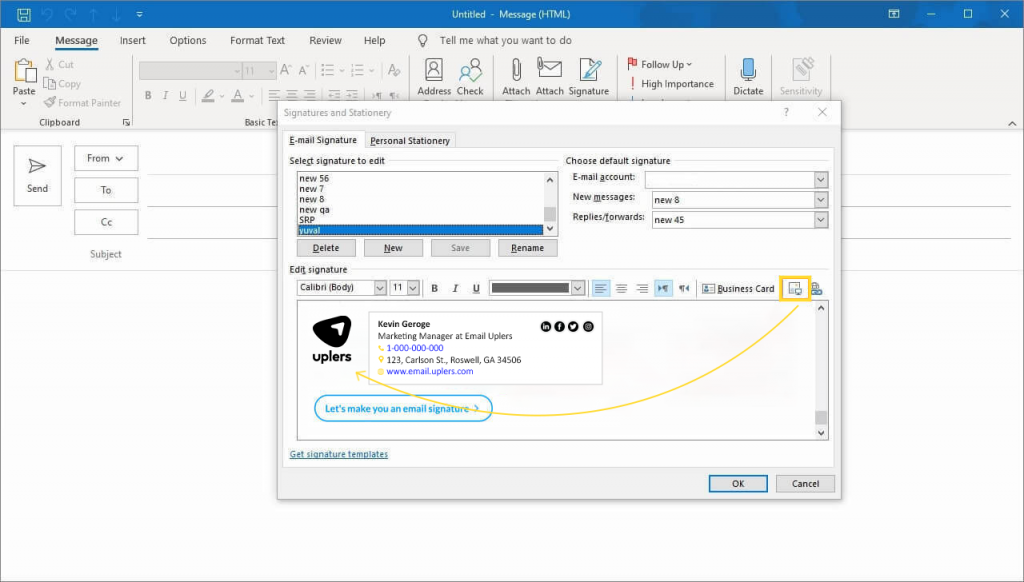
Next comes the resizing.
Click on the image and drag one of the black squares at the corners of the image. Resize it according to the rest of your email signature.
You can also make the image clickable. Select your image with the cursor and then click on the link icon from the tool strip.
Add the URL and click on OK.
You can even add social media icons to boost the brand visibility. Just add the icons as images and drag them at the appropriate position. Select the icon and click the link button from the toolbar. Add the correct link to the icons.

Additional Tips:
The editor’s toolbar allows you to add a table and organize the signature in rows and columns.
However, it can render differently according to the size of the screen. Therefore, keep the signature width under 360px.
Stick to one font color that matches your branding guidelines.
The font size that you choose for your name and job title should be somewhat bigger than your contact details. Format your name in Bold font type and keep your designation and company name in regular font type to draw more attention to the name.
Setting Auto Outlook Signatures
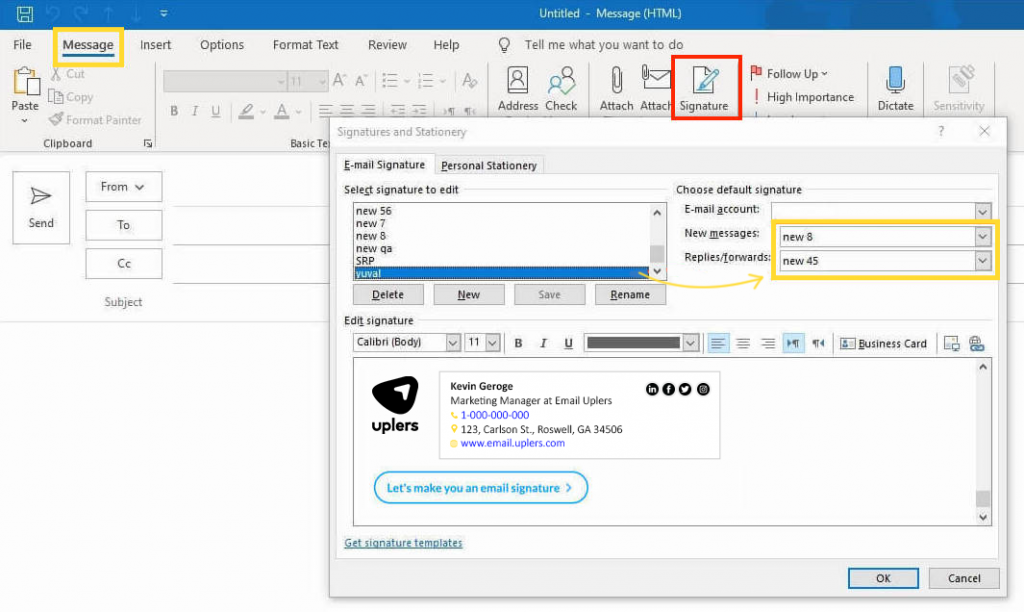
There are two options if you want to add an Outlook signature automatically: Whether you want the signature to be displayed in your “New messages” only and/or in your Forward and Reply messages also.
Navigate to the corner at the top-right side of the Outlook editor. Look for 2 dropdown menus — one to set an auto signature for the New messages and another for the Forward/Reply messages.
Every menu will give you a list of all the signatures available.
Select the signature you want to use for your email communications.
Once done, click on “OK” to save the preference.
To preview the signature, open a new message in the Outlook interface and look for it at the bottom.
How to manage the signatures?
You can manage the signatures by clicking on the “Signature” button at the top in the message window itself. Choose the signature you want for the email and it’s done.
That’s about adding plain text email signatures. Just like emails have an HTML version, your signatures can have too.
How are HTML email signatures different?
Plain text signatures have basic elements listed below:
1. Your name
2. Your designation and company name
3. Contact details
4. Social media links
5. An image
On the other hand, HTML Outlook signatures can have lot many other elements like:
1. YouTube video thumbnail
2. Custom button
3. Banner
4. Call-to-action and links
5. Scheduler
6. Email disclaimer
7. Instagram gallery
8. Quote of the day
9. Green footer
10. Hand signature sign off
11. Online payment button
Adding signature in Outlook 365 Web App
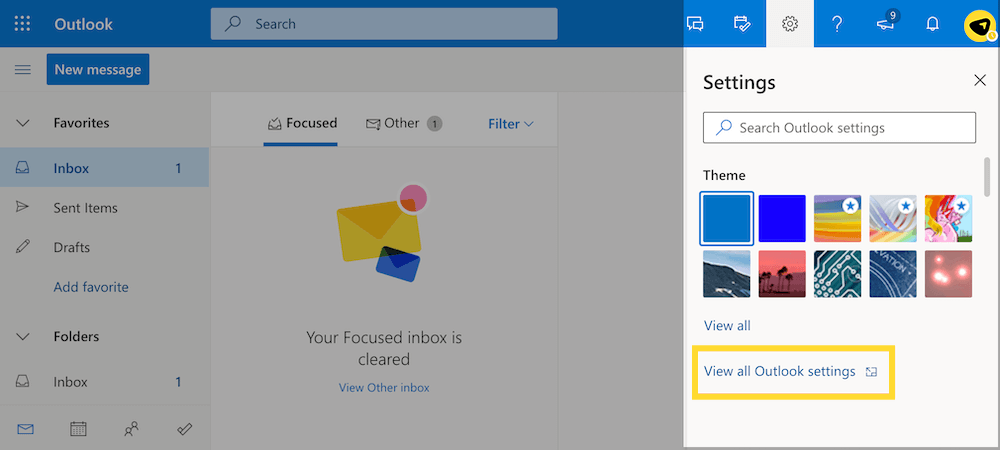
Navigate to the gear icon at the top right corner of Outlook 365. Settings menu will open on the right. Scroll through it and click on “View all Outlook settings”.
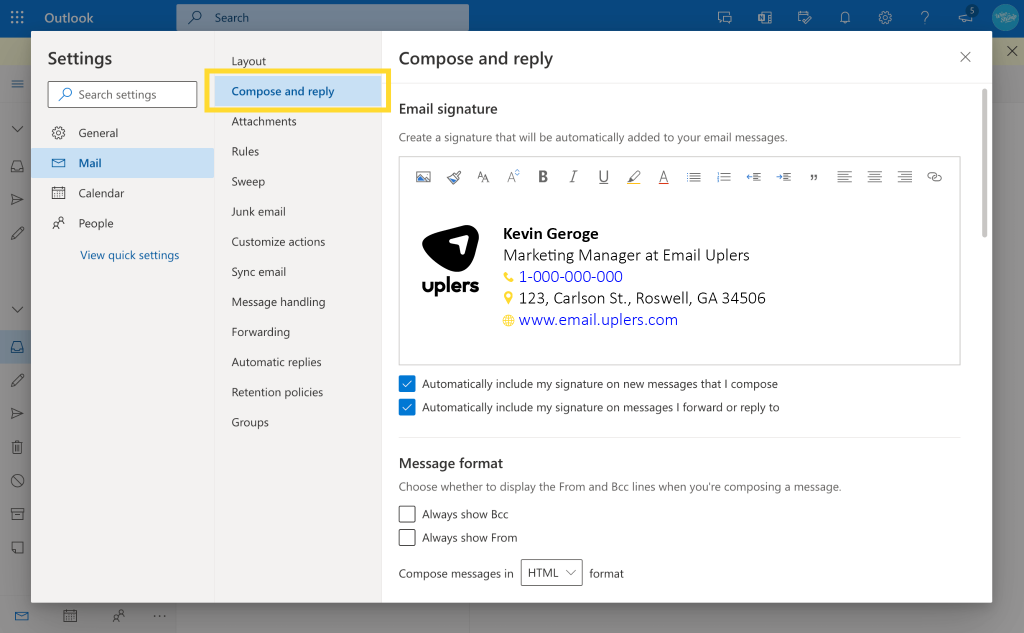
Open the signature editor and select “Compose and reply” from the left sidebar.
Create the signature by writing the details in the in-app signature editor.
Click on “Save” once done.
Formatting the Signature in Outlook 365 Web App
Just like Outlook 2016-2019 versions, you can format your signature with the help of the toolbar at the top. It will allow you to set different font color, font size, alignment, and text formatting like bold, italic, and underline.
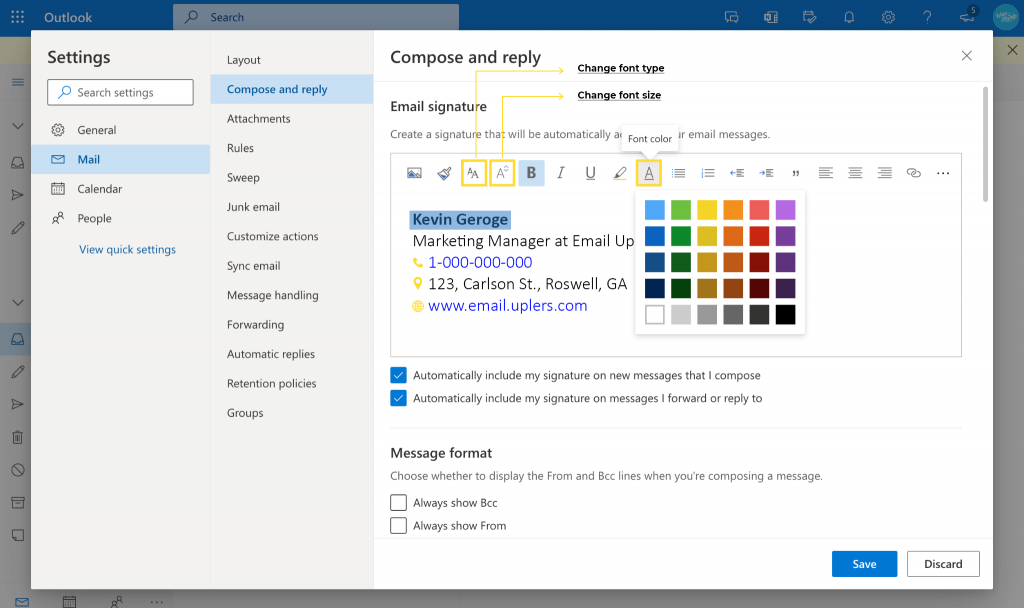
Adding a Hyperlink to the Signature
Select the text you wish to add the link to and click on the link icon in the toolbar.
Insert the URL and it’s done.
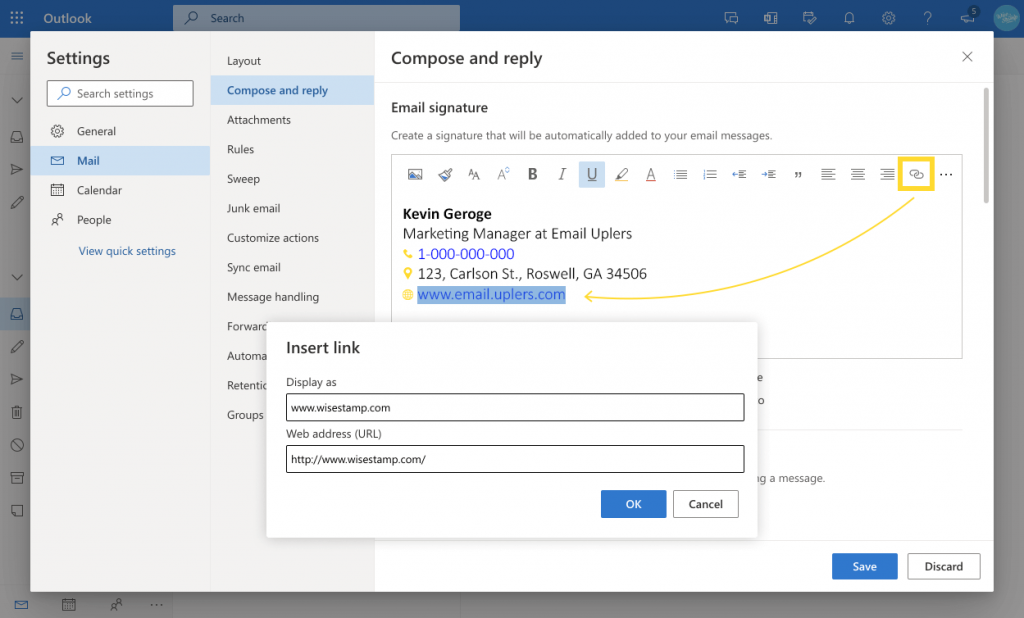
Similarly, you can make the telephone number clickable so that the user can directly place a call simply by clicking through. Insert the prefix “tel:” with the phone number like “tel:1-000-000-000”.
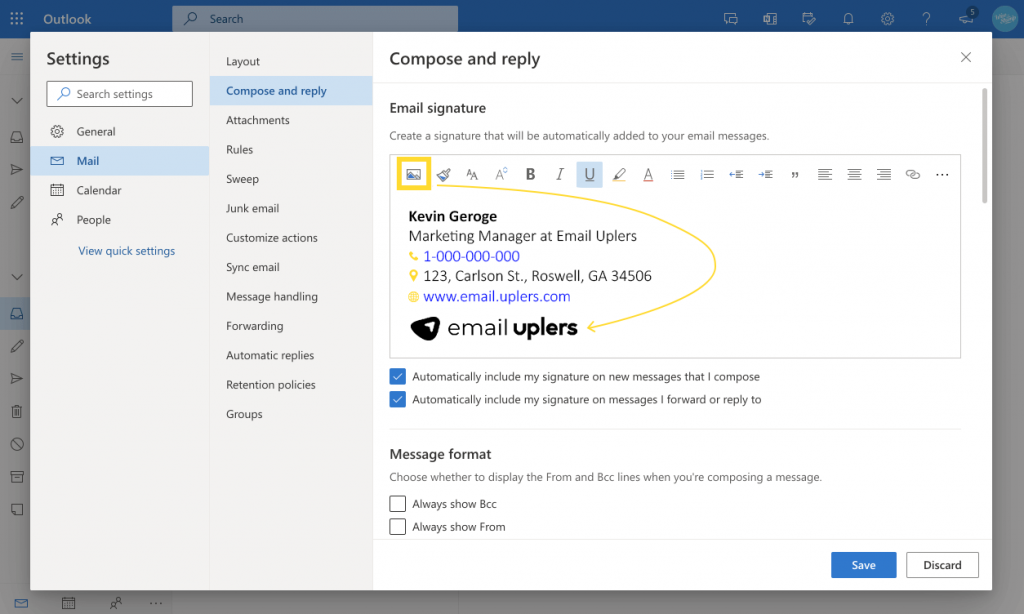
Adding Image to the Outlook 365 signature
Click the image icon in the toolbar and upload an image from the computer. Drag and drop the image into the suitable position. You can even cut and paste the image.
Try out different image sizes to create the perfect visual appeal in the signature.
Remember that you will not be able to add an image from any URL in Outlook 365.
Also, the signature layout might break if you add an image.
Setting Automatic Outlook 365 Email Signature
Select the two default signature boxes – one for new messages and another for forwards or replies. (They will be checked by default in Outlook)
Click on “Save” and it’s all done. Now, you will be able to see the signature in all your emails.
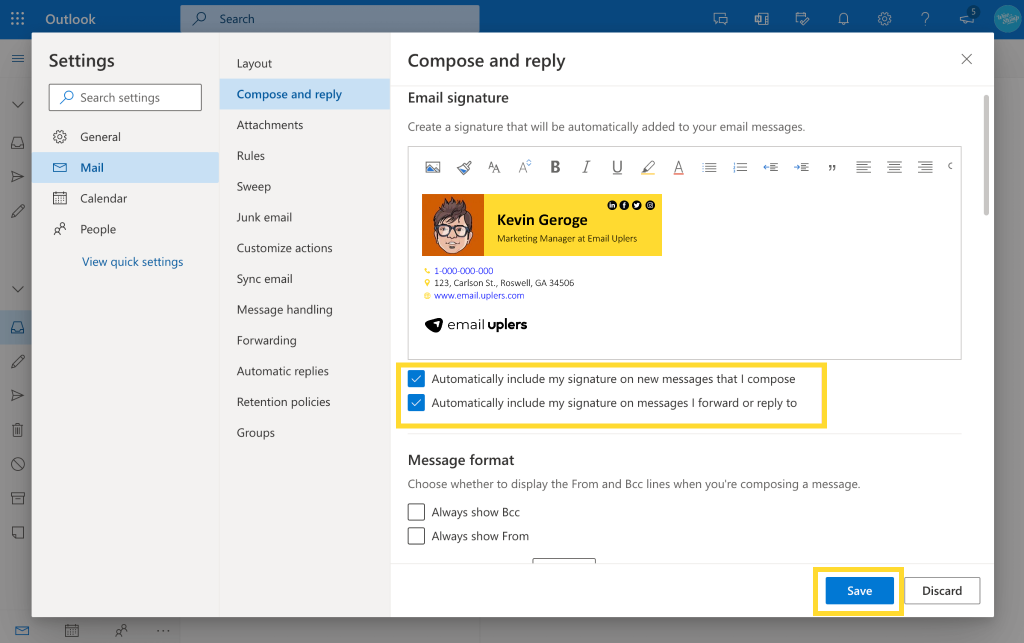
You can change the signature whenever you want.
You can also add your signature to a single email.
Uncheck both the boxes (for the new and forward or reply emails).
Then, copy and paste the email signature in the new message window whenever you want to use it.
Outlook 365 allows only one automatic signature in an account. So, you need to copy-paste the signatures manually as and when you want to use them.
Adding Email Signature in Outlook 2010 Version
Open Microsoft Outlook 2010 and execute the steps below:
1. Click on the “New” button and assign a name to the new signature.
2. Hit OK
3. Draft the signature in the text box with the help of the tools offered by the editor.
4. Some people even paste the signature in image format but it is not recommended.
To edit a signature, here are the steps:
5. Select the File tab and click on Options from the left side menu.
6. Once the Options window opens, select Mail from the menu.
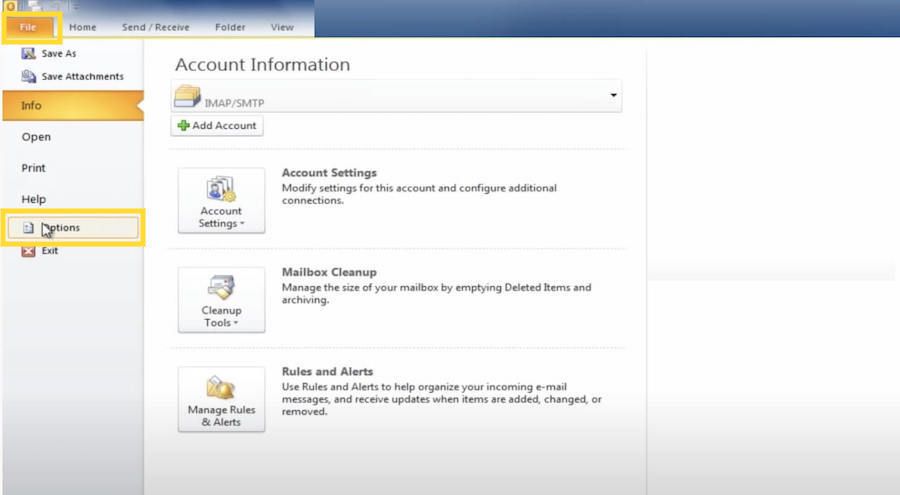
7. Under the “Compose messages” option, click on the “Signatures” button.
8. Edit the signature by choosing the signature from the “Select signature to edit” option.
Setting the Email Signature in Outlook Mobile App
Launch the Outlook app on Android or iOS devices.
Tap on the account image at the top left corner.
Open Outlook settings by tapping on the gear icon at the bottom left.
Tap on the “Signature” option and open the signature settings.
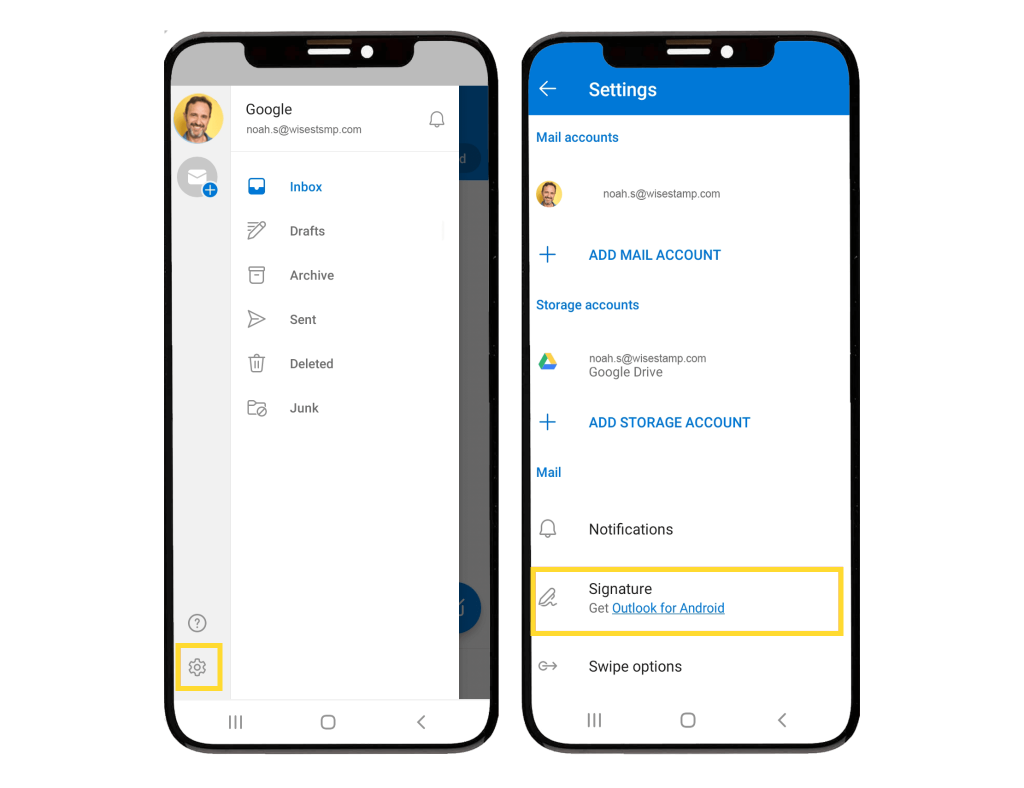
Create the signature by typing in all the details.
Once done, tap on the checkmark at the top right and complete the set up.
To add a link to the Outlook signature, create the signature in a new message window.
Type in the message.
Select the text you want to hyperlink and then insert the URL.
Select the entire signature and copy it.
At the top left corner, tap on your account image.
Hit the gear icon and open Outlook settings at the bottom left.
Open the signature settings by tapping on “Signature”.
Paste the signature in the signature text field.
The signatures in Outlook for Android and iOS work differently.
On Android, you will not be able to add an image in Outlook email sign. But you will be able to do so in Outlook for iOS.
The latter supports HTML and lets you add images, icons, and buttons to the Outlook signatures. On the other hand, you can have a plain text-based signature with links in Outlook for Android.
Adding Multiple Signatures in Outlook
Outlook desktop versions allow you to add multiple signatures. Here’s how you can do it.
Creating different email signatures in Outlook 2013, 2016, and 2019 versions
Open the Outlook screen and go to the search box at the top-left side.
Type in “signature” and click on the “Signature” result shown on the screen.
Click on Signature from the dropdown menu. It will open the Outlook signature editor.
You can create multiple signatures by clicking on the “New” button.
As mentioned earlier, assign logical names so that you know where to add them.
Click “OK” and then open a new message.
Click on Signatures at the top of the toolbar and pick the signature of your choice.
Creating different Outlook email signature templates in Outlook 2007 and 2010
Open a new message in Outlook desktop app
Go to the top ribbon and choose “Signature”. Then, select the “Signatures” option.
You will be able to make multiple email signatures by clicking on the “New” button in the Outlook signature window. Just make sure that you add suitable names so that you know when to use which signature.
Now whenever you open a new message, click on the “Signature” button from the top ribbon and pick the suitable signature from the dropdown menu.
Creating multiple signatures in Outlook 365
Navigate to the gear icon at the top right corner of Outlook 365.
Write “signature” in the search box at the top of the Settings panel
Select the “Email signature” result and you will see the signature editor panel.
Create a “new signature” with the in-app signature editor.
Go to “Edit signature name” before the signature field and assign the correct name to your signature.
Click on “Save” to complete the process.
To create more signatures,click on the “New signature” button.
Repeat the steps 4 to 6 as discussed above and your signatures will be ready.
Other methods to create multiple signatures in Outlook
Instead of creating the signatures from in-app editors, you can also use other methods discussed below:
1. Using “My templates” option
If you want to make multiple plain text signatures without any images, buttons, or fancy links, you can use the “My templates” option.
This method includes the steps given below:
1. Open the web app message box of Outlook 365 and click on “New message”.
2. Find the 3 vertical dots at the right end of the toolbar at the bottom and click on it to see a menu.
3. Select “My templates”, the second last option in the list.
4. You will be able to edit the existing templates or create new templates with the help of the “Add template” button.
5. Then, you will be able to click on the templates and add them from the message box.
6. If you want to insert an existing signature, go to step 2 and select “Insert signature”. It is the second option in the menu.
2. Using an external document
While you can add a more complex design with this method, it is somewhat difficult to implement and not so effective.
Here’s how to apply it:
1. Use an HTML editor to prepare multiple signatures. You can even use graphic designing software like Photoshop for this
2. Save the signatures in Microsoft Word or Google Docs.
3. Whenever you want to add a signature to any email, you can directly copy and paste it from the document.
3. Using a signature generator
You can use a tool like HubSpot, Newoldstamp, and Wisestamp to create multiple signatures.
Outlook mobile does not allow you to create multiple signatures.
How to make the same signatures for Outlook mobile and desktop versions?
If you are using Outlook for Android, you will not be able to create the same signatures for mobile and desktop versions. The reason being that it does not support HTML.
For Outlook iOS and desktop, you can match the signatures by creating an HTML signature.
Limitations of Email Signatures
1. Just like HTML emails, HTML signatures will be distorted when forwarded.
2. As email clients, including Outlook do not allow uploading media queries, you will not be able to create responsive signatures.
Email Signature Generator Tools to Create Impeccable Outlook Signatures
If all these steps discussed above seem too overwhelming for you, you can take the help of free or paid signature generator tools. They are:
- HubSpot
Besides offering the CRM marketing and sales features, HubSpot also works as an email signature generator. It is suitable for small brands and influencers.
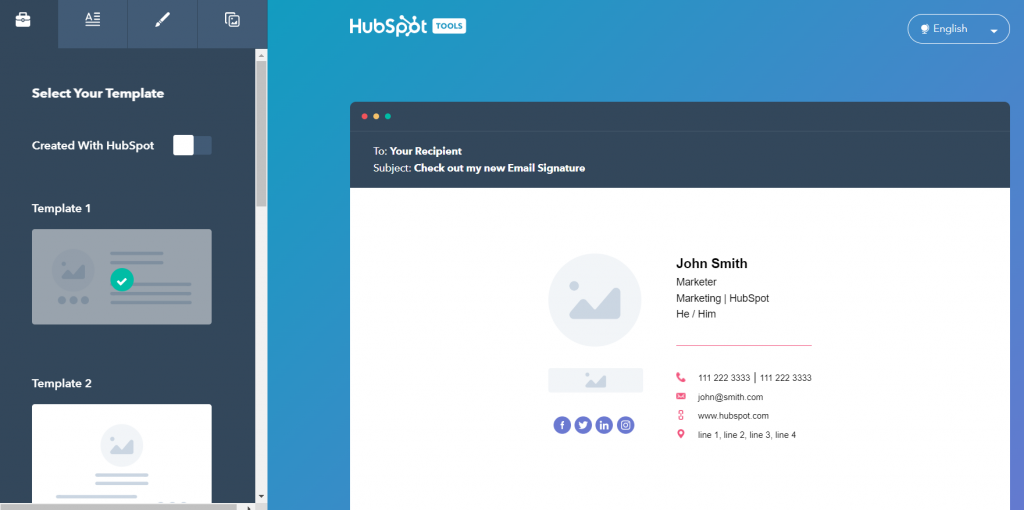
You need to fill up the information form with all your contact details and links to social media accounts. You will be able to edit colors, fonts, patterns, and other design parameters in the signature according to the company branding guidelines.
Subsequent forms will let you include a text or picture as a CTA. You will be able to add HubSpot academy certifications too that will help you and your company stand out from the competitors. HubSpot Signature Generator tool is available for free.
You can add the new signature to Outlook for Windows and Mac by following the steps mentioned below:
1. Navigate to the Home Tab in the Outlook account and select “New Email”.
2. Click on the Message tab.
3. Select Signatures from the “Signature” option in the “Include group” section.
4. Select the account in which you would like to add the signature from the dropdown menu in the Choose Default Signature section.
5. Click on the “New” button in the “Select Signature to Edit” section and assign a name to your signature.
6. Paste the HubSpot generated signature in the Edit Signature section.
7. Hit OK and you are done.
Now, let’s understand how you can add the signature to Outlook.com and Outlook on the web.
1. Once you log in to Outlook on the web, click on the gear icon at the top-right corner.
2. Go to “View all Outlook settings” at the bottom of the column.
3. Select the Compose and Reply option from the Email section.
4. Assign a name to the signature in the Edit Signature name field.
5. Paste the signature for Outlook in the Edit Signature section.
6. Hit Save.
Easy, right?
2. WiseStamp
WiseStamp is an ideal tool for freelancers and individual senders. It is the easiest to use with free as well as paid features. You get access to more than 50 ready-made templates. Take a look at this screenshot to understand how convenient it is to use this tool.
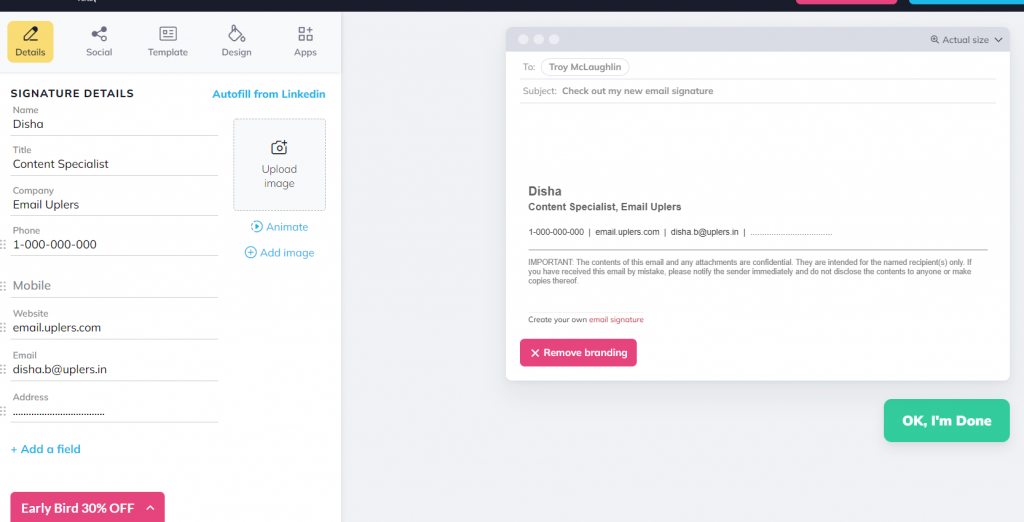
You can even autofill the details from LinkedIn. If you want additional features like removal of the watermark, animated images, and premium templates, you can purchase the pro version at USD 3.90 per month billed annually. (Early bird offer at 30% off as seen on 8th August 2022)
They also offer a 14 day money back guarantee in case you do not like the features.
3. Newoldstamp
If you are a huge corporate or big business, Newoldstamp is the best tool for you. It will allow you to make a visually aesthetic and impactful signature, rich with CTAs, banners, social media badges, and applications. Through this tool, you will be able to streamline brand-consistent email signatures across the entire company. And what’s more? It will allow you to manage all the signatures through a single dashboard.
They offer you a huge range of customizable professional email signature templates that can be integrated in Outlook. FedEx, GoDaddy, Vodafone, and Nestle are some of the brands that rely on Newoldstamp for their signature email marketing.

You can easily add these signatures into an Outlook account or any other email client too.
The branding plan is available at USD 7 per month. It entails all the basic features of custom signature generation and central signature management. If you are looking for advanced features, you can go for the marketing plan at USD 9 per month.
4. Designhill
Designhill allows you to create an email signature in a minute, and that too a custom email signature. It is compatible with all the popular email clients like Gmail, Outlook, Apple Mail, etc. Designhill has plans for individuals as well as businesses. The individual plans are suitable for startups, freelancers, or individuals who want to build a great professional identity.
The business plans are suitable for small businesses, growing businesses, corporates, and enterprises. It also allows you to add addons to the signature. The interactive email signature generator makes your job really easy without any technicalities involved.
To add the signature to the Outlook client, just follow the steps listed below:
1. Go to your Outlook account.
2. Hit “File” and go to Options at the top left corner of the screen.
3. Select “Mail” from that menu.
4. Click on “Signatures” and create or edit the signature.
5. Copy the signature created and paste it in the box.
6. Save the changes and it’s done
Optionally, you can even copy the source code instead of the entire signature.
5. Email Signature Rescue
Email Signature Rescue allows you to create customized email signature designs instantly. They have a huge collection of more than 60 pixel-perfect. signature templates. These signatures are premade by reputed agencies. You just need to enter the design code mentioned under the design you like. You will be able to upload the images from your device and add the logos and banners of your choice. It also has image-editing features like resizing, cropping, and circle-cropping. Whether you want to change the font style or size or change the complete design, the online editor of the software will allow you to preview the signature in real-time. As the templates are tested in all major email clients, you can be assured of its renderability and compatibility. The pricing starts at USD 60 per year for 3 users and goes up to USD 240 per year for 20 users. In case you want to add more users, you can do so at USD 12 per user per year. If you are not happy with their features, you can ask for money back in 7 days. Sounds good, right?
Wrapping Up
Creating a signature in different Outlook versions is pretty straightforward. You just need to follow the steps discussed here or take help of the tools. Just remember that you might have to limit your design freedom for signatures due to compatibility issues, but make sure you try to make the most of the features supported in the email clients.





Disha Bhatt (Dave)
Latest posts by Disha Bhatt (Dave) (see all)
How to Get the Most Bang for Your Buck with Salesforce Marketing Cloud Preference Centers
4 Ebook Landing Page Inspirations That Will Help You Amplify Your Downloads!